Tanking A Cellar 101: The Complete Basement Tanking Guide (Floor And Walls Included)
Whether you’re a builder, decorator, plumber, or hands-on homeowner, dealing with damp and water ingress is a familiar challenge in properties with below-ground rooms. So, for any below-ground conversion, renovation, or even protection, tanking a cellar is one of the most important steps to get right.
When done properly, tanking creates a dry, usable space that protects the structure of your building long term. But with so many products and methods out there, it can be tough to know where to start. Enter this guide – whether you’re sealing walls, preparing floors, or dealing with mould from rising damp, we’ve got your back.
This guide is pretty comprehensive, so feel free to skip to what you need most. Alternatively, grab a brew and stay for the whole show.
In its simplest terms, tanking a cellar is the process of applying a reliable waterproof barrier to the internal walls and floors of a basement to prevent water ingress, damp, and mould. More specifically, it’s a type of structural waterproofing used to create a fully dry environment below ground level – essential for converting cellars into usable spaces.
Unlike external waterproofing, tanking a cellar is typically carried out from the inside, making it particularly useful if tackling an older building, since it allows for retrofitting when access to outer walls isn’t possible.
Contractor or site engineer? You might want to explore the BS 8102 code of practice for the protection of below ground structures against water ingress for more detail and comprehensive guidance.
Why Proper Tanking Matters
A poor or incomplete tanking job can lead to persistent damp issues, structural damage, and costly rework down the line. That’s without even mentioning the tools and equipment that would have been wasted during the sub-standard process.
Below-ground spaces are especially vulnerable to water ingress due to the constant pressure and saturation of moisture in the surrounding soil. Without properly tanking a cellar, moisture can seep through porous walls and floors, leading to peeling paint, mould growth, unpleasant odours, and in some more serious cases, interior flooding. Over time, this will degrade almost everything in the basement space, including plaster, timber, electrical systems, and your belongings – safe to say, not ideal.
So, not only does a proper tanking job help you avoid those unwanted complications, but it can also:
Protect the structure of the building from damp-related deterioration
Improve indoor air quality by preventing mould
Enable safe use of the space for storage or living
Add value to the property by creating a new usable area
Safeguard finishes like plaster or flooring
In short, tanking a cellar properly is more than just a preventative measure: it can even be an investment in the future longevity and value of the property.
Before You Begin
Before pushing on with the physical work of tanking a cellar, it’s essential to first understand what it is you’re working with and how to prepare the space properly. Skipping these early steps will undermine even the best of tanking products, so a bit of planning goes a long way. As the saying goes: failure to prepare is preparing to fail.
Here’s what you need to cover before you get started.
1. Address The Source of Moisture
Not all damp is the same, and misidentifying the issue is a sure route to tanking failure. Before doing anything else, determine where exactly the water is coming from, and how it’s entering the space. You could be dealing with:
Rising damp – where groundwater moves up through porous building materials. This is particularly common in older properties that may not have a damp-proof course.
Lateral damp – where water pushes through underground walls due to ‘hydrostatic pressure’ (the resting pressure of a liquid due to gravity).
Condensation – where poor ventilation or fluctuating temperatures cause a build-up of moisture.
Each of these conditions may require slightly different approaches or complementary solutions. For example, tanking is great for keeping water out, but drainage and ventilation may also be needed if condensation is the issue.
2. Check Structural Integrity
Before applying any products, you should inspect the condition of the surface they’ll be applied to. If the walls are crumbling, cracked, or unstable, the tanking will not adhere properly. Ultimately, you’d be wasting your time and product.
Here’s what to check for, and what to do about it:
Issue
What to Look For
Recommended Action
Cracks in masonry/render
Hairline or stepped cracks; diagonal or horizontal fractures.
Fill small cracks with a reliable product like HB42 Sealant & Adhesive or consult a pro for larger cracks.
Hollow-sounding render
Tapping produces a hollow noise; visible bulging or flaking.
Remove loose material until you reach solid substrate before tanking.
Crumbling mortar
Mortar joints powder when brushed or touched.
Rake out and repoint with suitable mortar; stabilise before tanking.
Spalling brick or block
Surface of brick face flaking, crumbling, or falling away.
Replace damaged bricks and ensure the surface is solid before coating.
Efflorescence
White, chalky or fluffy salt deposits on walls or floors.
Brush off thoroughly; address moisture source before tanking.
Previous repair materials
Old tanking coatings, bitumen paint, or incompatible damp-proof systems.
Remove all incompatible materials and prep back to bare masonry.
3. Clean and Prepare All Surfaces Thoroughly
In true DIY fashion, overlooking preparation is where most basement tanking jobs go wrong. Tanking products need a clean and absorbent surface to bond effectively, meaning that dust, oil, paint, or efflorescence will compromise the seal if present.
At minimum, your prep should include:
Removing old paint, sealants or plaster;
Cleaning off efflorescence with a stick brush;
Levelling out the floor (if required);
Washing off grease and dust before allowing the area to dry;
And repairing any weak spots.
For older cellars or heavily painted surfaces, this can take time, but trust us – it’s critical to long-term success.
4. Plan For Ventilation And Drying
Dark, humid, and little natural airflow: basements and cellars can be challenging environments to work in. Conveniently (or not), many tanking products need proper ventilation to cure correctly. Poor airflow slows drying times but also increases the risk of mould and condensation forming behind your finished surfaces.
So, take a few minutes to ensure that there’s good air circulation – whether that’s with fans or dehumidifiers. If it’s particularly cold or wet weather, it’s probably best to avoid tanking until it’s a bit warmer and drier outside. Additionally, ensure that throughout the process you respect the advised curing times of your chosen product; otherwise, you risk peeling, uneven coverage, and reduced waterproofing performance.
Keep in mind: If you’re planning to install flooring, panelling, or any other finishes after tanking a cellar, these should only be added once you’re confident that the coating has fully cured and the space is moisture-free.
5. Choose The Right Products For The Job
As much as it’d likely be easier, tanking isn’t just about slapping on any old waterproof coating: it’s about using the right quality system for your specific space, conditions, and the extent of your problem. Here’s a quick checklist of key features to look for:
Flexible application without needing mixing
Strong adhesion to all common surfaces
Overpaintable finish
Suitable for both internal and external use
Quick drying and durable
Odourless and user-friendly
Suitable for application to both dry and damp conditions
Ability to be used seamlessly alongside sealers and adhesives
https://www.youtube.com/watch?v=SnIKcbdbDx4&t=24s
Enter HB42 Ultimate Waterproofer: with all of the above features, it’s a go-to for DIYers and tradesmen alike, thanks to its ease of use and reliable performance.
In addition to your chosen waterproofer, you’ll need:
Paintbrushes or masonry rollers
Gloves, safety goggles, dust mask
Dust sheets and masking tape to protect fixtures
Fans or dehumidifiers to aid curing
Portable lighting (especially in windowless cellars)
For floor tanking: a long-handled roller or squeegee
Tanking A Cellar: Step-By-Step
Right, let’s get down to business. Assuming that you’ve followed our prep steps, below is a practical, easy-to-follow breakdown of tanking both floors and walls below ground level.
Wall Tanking
Lightly mist the walls with clean water before applying the product to help prevent the masonry from pulling moisture out of the product too quickly.
Use a stiff brush or roller to apply HB42 Ultimate Waterproofer (or another product) directly to the wall. Work it firmly into the surface, bottom-up. Aim for a full and even coverage with no missed patches or thin spots. Leave the first coat to dry for the recommended time.
Once the first coat is dry, apply a second coat at right angles to the first (so if you used vertical strokes the first time around, use horizontal strokes this time, and vice versa). Pay particular attention to getting into the grooves around any corners, joins, pipework, or fixings. Allow the coat to dry fully.
For vulnerable wall-to-floor joints, use a reliable product like HB42’s range of sealants before tanking over them. If you plan on tanking the floor too, apply both the wall and floor coatings slightly over the joint to create a seamless seal.
https://www.youtube.com/watch?v=wF2L1gg2SqA
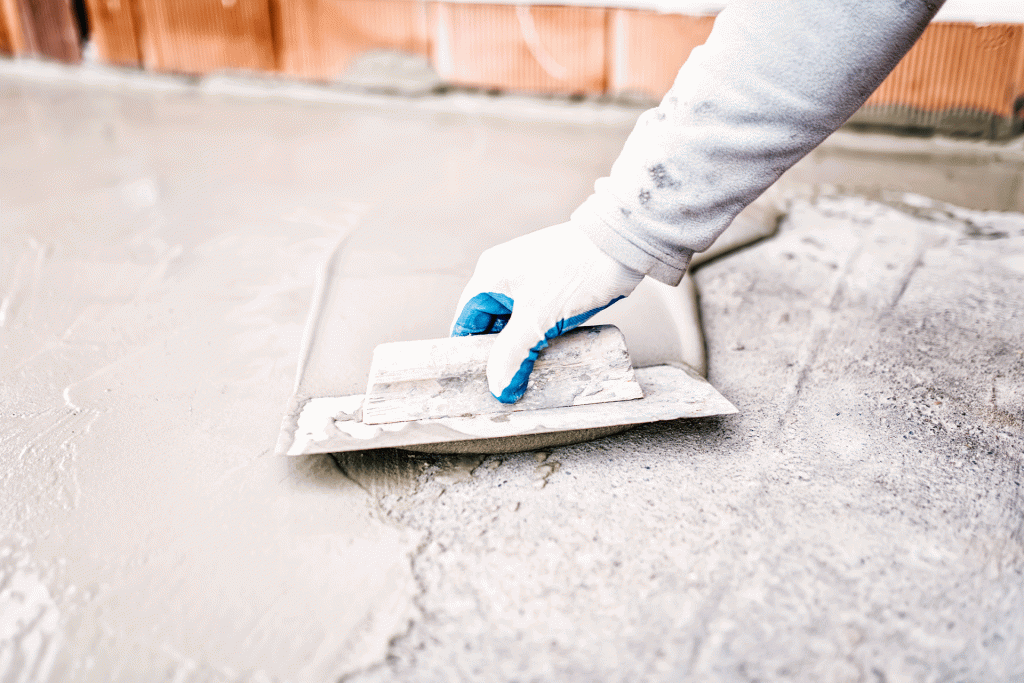
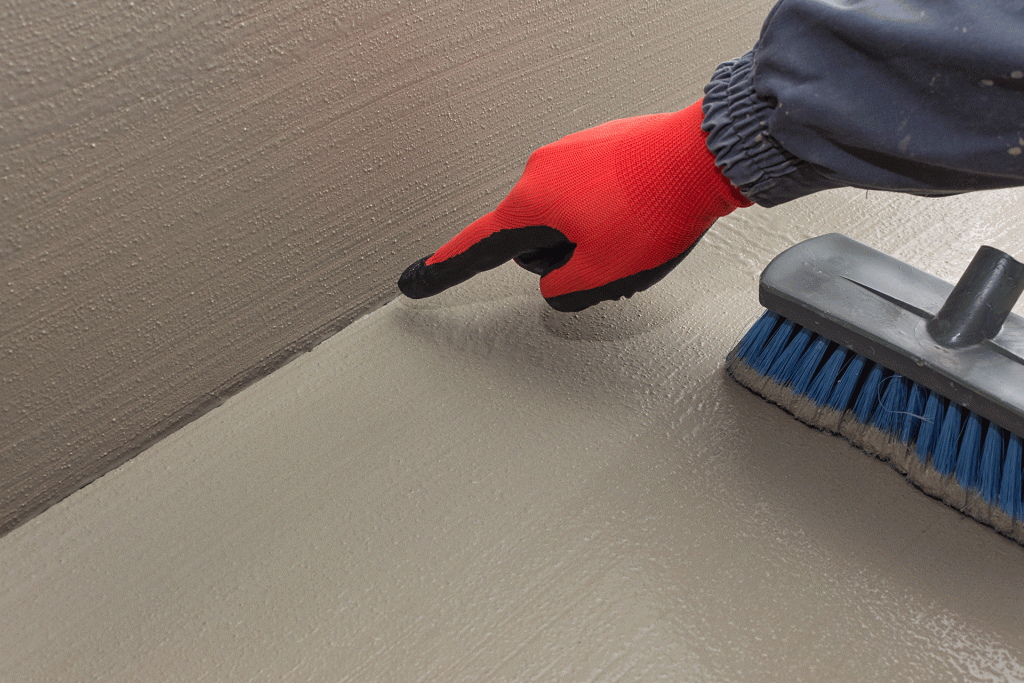
Floor Tanking
Apply the waterproofer using a roller or large brush by beginning in one corner and working methodically across the space, spreading the product evenly as you go to avoid pooling. Allow the first coat to cure fully before adding a second coat.
When applying the second coat, use brush strokes at right angles to the first once dry. Be sure to overlap the wall coating to create a continuous barrier.
If you’re finishing with screed or flooring, consider adding a protective membrane or additional insulation layer before installation.
Common Mistakes To Avoid
Now that you know how to go about tanking a cellar properly, it’s just as important to understand what not to do. Here are some of the most common pitfalls and how to avoid them:
Overlooking Structural Movement
Even if walls seem solid and sturdy, basements are prone to slight movements due to ground shifts or temperature changes. If you choose a tanking product that can’t flex, it’s likely you’ll get some pretty nasty cracks in no time. Instead, choose a slurry with built-in flexibility.
Tanking Over Incompatible Materials
Some older plasters or paints can contain salts or contaminants that prevent proper bonding, even if they look fine at first glance. To make sure that your chosen product works efficiently, test adhesion on a small patch before applying it to the full area, or if you’re unsure, strip back to bare masonry.
Neglecting Access Points And Penetrations
Pipes, cables, and other penetrations through walls and floors are common weak spots where moisture can still sneak in if not properly sealed. In fact, overlooking these areas can compromise your entire tanking job if left unaddressed. So, before applying tanking, always be sure to fill these gaps with a flexible, waterproof sealant.
Assuming Tanking Alone Solves All Damp Issues
Whilst tanking does a great job of protecting your cellar from moisture ingress, it’s not always a complete fix on its own. Problems like poor ventilation, external water pooling or leaks will still cause damp or mould if they’re left unaddressed. For the best long-term results, consider tanking as part of a wider damp and mould prevention strategy.
Covering The Area Too Soon
Tanking isn’t a process to be rushed. Finishing or covering tanked walls and floors before the product has fully cured can trap moisture beneath the plaster, leading to blistering, mould growth, or just straight up failure of the waterproof barrier. Always check and follow the recommended curing times: you can speed up the drying with fans and/or dehumidifiers but avoid rushing the process.
That’s A Wrap
Tanking a cellar might not be the most interesting job on your renovation list, but when it’s done properly, it lays the (below) groundwork for a dry, usable, and protected space.
From prepping your surfaces and choosing the right products to applying evenly and letting it cure fully; each step has a role to play in creating a watertight barrier that lasts. And, with a reliable product like the HB42 Ultimate Waterproofer, you can tackle even the most challenging spaces without worrying about, well, tanking it.
On a bit of a research grind? Check out our other posts for expert advice and product guidance that helps you get the job done right the first time. Or, if you’re done with all this theory, explore our comprehensive range of trade products.
HB42 is a registered Trade Mark. A Premium Range of ‘Professional Trade’ Products. Privately owned and distributed by Hilton Banks Limited with central offices and warehousing in Middlesex, UK.


0 Comments